A path tracer with CUDA - prt 2
Table of Contents
In the last post I decide to follow the tile strategy. We want to process tiles of pixels in parallel. Each thread will handle a single tile by rendering all its pixels sequentially, then each tile will be indexed based on the thread’s grid position (CUDA):
The first consequence here is that multiple tiles will dispute for the local memory in the streaming multi-processor. But let’s keep simple and go on :)
The pixel region the tile tile_index covers can be easily computed as:
Now we render each pixel sequentially. Each pixel spawns multiple rays that will contribute with its final color. The rays leaving a particular pixel
are generated following randomly sampled points in the pixel area. The Sampler class takes the pixel position and generates the random points we need.
Each point is then passed to the Camera that computes the actual ray. Rays are instances of RayDifferential.
Each ray accumulates radiance (stored in the Spectrum class), and the combined radiance of all rays of a pixel will give its final color.
However, considering that real-world cameras
may register the final image into different types of film, we might want to apply filtering to our pixels as well. Thus, the idea is to have a class
FilmTile that perform those operations and is merged into the final Film later to form the final image. Here is the code:
Ok, there is a lot going on already and lots of classes that were not properly introduced. However I must recall that all that comes from PBRT. I’ll focus only on the main differences and details about my implementation.
Let’s start with the Sampler.
Sampling Pool⌗
Each rendering technique will require different amounts of samples per pixel. Each sample can be 1-dimensional or 2-dimensional. For example, we may need a sample for a 2D position in the pixel, and another 1D sample for time. We might even need arrays of samples as well. It really depends on the algorithm being used. However, each pixel will require the same amount of samples.
Since now we will be doing things on the GPU, the idea is to pre-allocate all necessary memory required by samples in the GPU global memory and let it just be recycled as pixels are rendered.
We could also avoid calculation during rendering by actually pre-generating samples before rendering. Regardless wether we store samples for all pixels or not, we still need to pre-allocate and manage memory for the samples. I’m thinking something along these lines:

The upper row in the figure represents the storage of a block of samples used by a single pixel. 1D and 2D samples are grouped in pairs that are called dimensional samples – nothing to do with 1D or 2D. The remaining stores the arrays of samples, which might not exist depending on the renderer.
Each block of samples (the entire upper row), in the figure called pixel sample, belongs to a pool item
in the SamplePool. The SamplePool manages all the memory used by the pixel samples from all tiles active in the GPU.
A pool item comprises a header
containing the sizes of the sample arrays stored in each pixel sample followed by an array of pixel sample blocks.
Each pool item can serve all the memory used by a tile for example.
Stratified Sampler⌗
I implemented the StratifiedSampler, which subdivides the sampling region (pixel area) with a regular grid and generates a
sample in each grid cell. A simple usage example goes like this:
Here is the output:
In another test considering sample arrays:
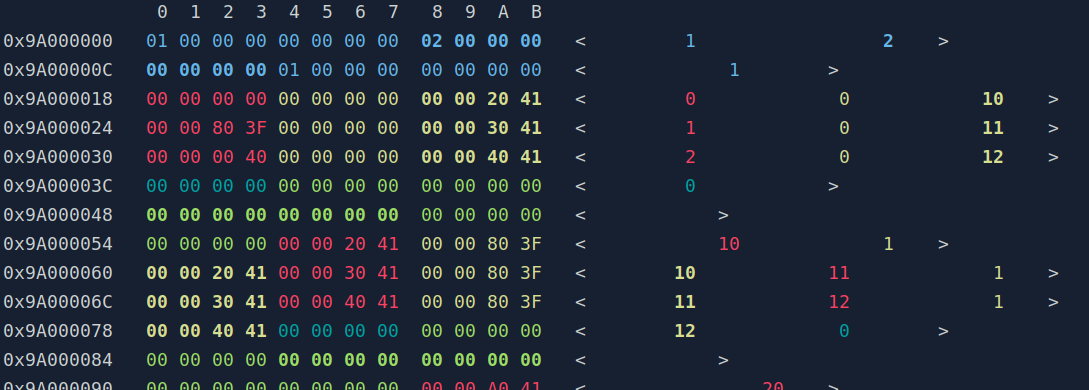
The screenshot bellow shows the beginning of the pixel sample block:

First we find the header containing the array sizes 1, 2, and 1. Then follows the list of pixel samples, being only 2 visible in the screenshot. The pixel sample starts with 3 pairs of 1 1D sample and 1 2D sample, with values [0, (0, 10)], [1, (0, 11)] and [2, (0, 12)] in the screenshot. In the remaining of the pixel sample lie the arrays (56 bytes).
Notes⌗
- Since pixels inside a thread are rendered sequentially, we could store samples just for 1 pixel per tile. Then every time the next pixel of that tile is rendered, the samples are re-calculated using the same memory.
The next post talks about how we deal with objects and data structures.